"My people will live in peaceful dwelling places, in secure homes, in undisturbed places of rest." - Isaiah 32:18

Tuesday, August 30, 2016

The Evolution of the Guest Room

Hello again!

Can you believe summer is over? School starts for us in just a few days, and I've been a busy bee flying around, trying to finish up my projects. The main one that I was determined to have completed by September 1st, is our new Guest bedroom. I ended my last post with a picture to whet your appetite:


Our home has four bedrooms upstairs. As it currently stands, we have a Master bedroom, a Girls' bedroom, a Boys' bedroom, and now this Guest bedroom. 

In my ten years of being a homeowner and homemaker, I've never had a Guest room in my home to offer to friends and family... until now. I am very excited to have this room! 

This room has changed quite a bit in the years we've lived here... and that's the theme of today's post! 

Come with me...

I'd like to take you on a walk down memory lane...

This is the same room:


Can you believe it?! 

When we bought our home, every room was either wallpapered or painted in very dark colors. This room was both! Lucky us! Haha... 

We didn't use this room for the first couple of years that we lived here, so it became sort of a storage room:


But when my Nola was a baby, I became inspired to create for her a beautiful, feminine bedroom. It was going to take time... and hard work... because I had no choice but to start here:


I had to start with the removal of the wallpaper.

It was painfully tedious!

If you look close you can see that a baby chair is in here:


That's because Nola would sit in here while Roman and I peeled wallpaper during the day...


And Micah took the night shifts:


Renovating this house has caused me to become an Accidental Wallpaper Removal Expert. (What do you mean that's not a thing?! That's one of my many official titles!!! Sheesh!)

Yes indeed, I know just what to do... The right products to buy, and the right technique. I'm not good at many things, but of all of the worthless things to be good at in life, mine is wallpaper removal... ***eye roll***

I have girlfriends who tend large and beautiful gardens... Sew homemade dresses for their daughters... And I'm over here like... I see your gardens and homemade dresses, and I raise you...

Wallpaper Removal!

Try not to be jealous ;)

But, after about a week or two, things start looking up:


You'll notice Micah's floor sander. As I've mentioned on this blog before, he refinishes every floor in the rooms we re-do. One room at a time has been our mode of operation. See the difference it makes:


Whenever we reach this point in a room re-do, I always get antsy to start decorating and moving the room forward. But there's still a few more things to do. For example, Micah has put up crown moulding in each room we've re-done. Here's a "during" shot:


Since this was going to be Nola's bedroom, we got the idea to build a daybed for her out of old pallet boards and an antique door that we found in our basement. Micah built it...


And I decorated it. This was her room "after":


We hung a chandelier... I made a ruffled lampshade... A birch branch from our yard hung above her bed with dangling paper birds...


I poured my heart into this room. 

Vintage vignettes...


And my childhood dollhouse, are only just a few of the details that I madly loved about this room:


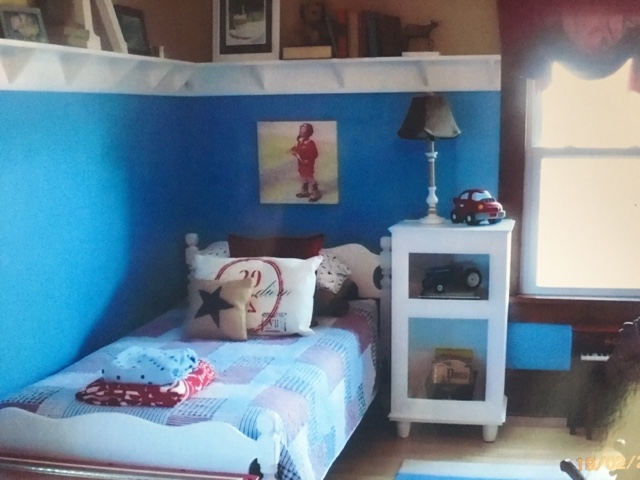
But when our second daughter was born, we decided to move our rooms around. We gave the girls' one of the bigger bedrooms to share, and this room became Caleb's. 

I would love to show you the girls' room right here, but I must stay on task! (That'll be for a future post:)

For the last several years, this room was Caleb's. I snapped this picture of it after he moved out:


SO... All of this has led to the opportunity to create a Guest room! And since this post is titled, The Evolution of the Guest room, it may be fun to see these photos altogether...

Ready?...

The Evolution of the Guest Room:


And Finally...

Ta-to-the-Da!


Whew! This room has been through a lot! 

I'm going to end it here for today, but check back with me soon. I'd like to write about more of the details next time.

Take care my sweet friends...

xo,

~ Courtney ~


Tuesday, August 23, 2016

New-Again Curtains

Oh, my dear readers! 

You will never know the turmoil I went through you bring you this post! 
If you follow me on Facebook you'll know that my iPad kicked the bucket and I didn't know if I'd ever blog again!

Sounds dramatic, I know, haha... But I had wondered if the Lord was telling me that my blogging days were over.

:(  :(  :(

Blood and countless tears were shed...

(Well, not literally of course, but that's how I felt!!!)

Then I saw a break in the clouds, and my guardian angel (aka Micah!) descended with a MacBook for me!

A MacBook!!!

(He's always been very supportive of my blogging efforts!)

I thought surely, all is saved in the blogging world! All will be well in my soul once more! All is fair in love and war!!!

Only there was one teeny tiny problem....

..............

I didn't know how to use it!!!

I had taught myself how to blog on my iPad, and this computer was completely different! I wanted to chuck it out the window give up many times, but I just kept thinking about you, my readers! I thought,  How will they ever get along in life if I retire my blog?! How will they sleep at night? can't do this wicked thing to them!!!

(I'M KIDDING! Calm down...)

Frustrated, I went to Micah and said, "I can't figure this stupid thing out. I need you to help me! I have a whopping 12 followers, and they're probably missing me right now!" So, he sat down with me and helped me work through the roadblocks I kept bumping into. He has always been very supportive of my blogging efforts. (Have I said that already?)

And all of this has led me to today. The day I put my big-girl pants on. The day I finally thought, I will persevere... I will overcome... There are millions of bloggers out there, they can't possibly all be smarter than me!

(Ok, so, the fact that they probably all are is beside the point. My sheer stubbornness has been enough to compensate for my lack of smarts all my life! Thumbs up!)

So... What do I choose to write about on my first day back in the blogging groove...? It's gotta be something compelling! Something Riveting! 

Hmmm.....

I KNOW!

I'll write about...

Curtains!

Aren't you so glad you've stuck around? {wink}

Well, in between the stressful and panicky moments of wondering how I will ever blog again, I've been keeping busy with a decorating project!

Micah's son, Caleb, has moved out of state to begin his college adventures, so we decided to turn his old room into a guest bedroom. I can't include everything I want to show you about this room in just one post, so today I will just be writing about the curtains I made for the room. 

Here's a peek:


Just to give you a little vantage point as to the work Micah and I have done in here, this was the room only a couple of weeks ago:


I could have closed the door and left well-enough alone. This room wasn't hurting anybody. But I have a disease. It's a serious condition called Decorating Compulsive Disorder. Experts agree that the only cure is for loved ones to back off and let the individual take out their decorating frustrations on the room they have targeted. 

For example, when I franticly approach Micah with pleas to help me move a heavy dresser, or hang some curtain rods, he just quietly shows up with tools.

See?


So, a little background on these curtains. I guess I should have said I semi-made them. They were originally made by my mother-in-law when Micah and I were first married. A brief photo-walk down memory lane shows the curtains in my very first little kitchen as a new wife:


My Roman, who will be eight this fall, was just a baby then...


When we moved into the house we're in now, I didn't have a good place for them, so I tucked them into storage where they've lived this whole time.

For this guest room project, I really tried to make use of items I already had. So, I decided to get these old curtains out and give them a try. I realized that they were going to be perfect for the look I was after. I wanted the guest room to feel warm and inviting, like a quaint Bed and Breakfast. But I only had two panels. This was going to require a little sewing project...

The morning I got to work on them was gloomy and rainy. The best conditions for a sewing project:


Roman offered to make breakfast for everyone so that I could get to work on it right away:


Thanks, buddy!

I got set up with everything I needed... My sewing machine and coffee...


Matching thread and my adorable thread carrier...


The "Hymns" station on my Pandora, and cute company:


What a wonderful way to spend a dreary morning!

The first thing that I did was lay one panel out to determine the center:


I cut it in half lengthwise, to make two panels for each window. I hung them before I did any sewing,  trying them out first to make sure it would be what I wanted:


I really liked it!!!

Yes! This was the direction I wanted to take this room.

So, my next step was to iron in my seam:


After sewing up the edge I repeated the process with the other window panel, and hung them excitedly!

Do you want to see the end result?

Of course you do!!!


Well, if you've stuck around for this entire post and have made it to here and now, I think you deserve it!

But don't let it spoil your appetite for my next few posts about this guest room!

Here she is:


~~~ I'm in Love! ~~~

Being creative with what I already had is how I accomplished my "Bed and Breakfast" inspired guest room. I've spent very little money on this room. But more about that in posts to come!

So... Are you glad I'm back, girlfriends? I am So happy to be blogging again! I have missed you!

I'd love to hear from you in the comments below! Feel free to say hi! (But please don't tell me that Decorating Compulsive Disorder is not a thing! Just ask Micah!)

;)

I'll be back here soon...

xo,

~ Courtney

Friday, August 19, 2016

Teaching Etiquette

Hello friends!

I'm just popping in quickly today with a short parenting post on etiquette.

One important job that we have as mothers is to teach our children social skills and social etiquette.

Here is an example of one small thing we can do to help teach this...

I got the idea a few months ago to take my children to a nearby cafe as part of our school day, to give them an opportunity to practice restaurant etiquette. I finally took the time this afternoon and we went.

My children have been in restaurants many times in their little lives, but we're always with other adults whom I'm trying to visit with. So, I'm distracted by that and not necessarily focusing on the etiquette of my children.

Today my goal was to sit with just them, undistracted, in an upscale cafe, to give them experience and training.  They did really well and we had a lovely time!

On the drive there I talked with them about my expectations for them and explained what we were doing. I told them that they were going to practice:

~ Being respectful and quiet in a "fancy" place.

~ Proper table manners.

~ Ordering for themselves.

~ Looking the waitress in the eye and speaking clearly when ordering.

~ Saying "Please" and "Thank-you".


I took all four of my kids, which would have been costly had we gone there for a meal. So my idea was to have lunch at home first and go to the cafe for dessert. It worked out quite well. Doing it this way accomplished what I was after and helped keep the cost down.

When the waitress came by with the dessert tray, I noticed the portions were large. I had my oldest three each choose what they would like, and asked the waitress for two extra plates. I sliced off a small hunk of the three desserts for the baby and I to share. 


It ended up being the perfect amounts for all of us! :)

Teaching table manners at home is essential, but doing something like this can help give children the skills to function well in society. Some things come up in restaurants that wouldn't necessarily come up at home. For example, when we were seated the kids noticed the utensils wrapped in cloth napkins. I'd love to say that we always eat our meals at home with cloth napkins, haha, but we actually eat our meals with a big package of wet wipes plunked in the center of the table! (Hey! Kids are messy!!!) But today I got to reinforce that cloth napkins are to be placed on the lap until we are through eating.

Another thing that came up today was one of my children being too loud. This particular child has a tendency to be a loud-talker, but usually at home this is overlooked. I had the opportunity today to tell my child, "Look around. Do you see that adults are trying to visit? Whenever you're in public, observe your surroundings and see where you fit in in regards to what's going on." I pointed out the table next to us where two ladies sat, visiting. I said, "You don't have to whisper, but you should bring the volume of your voice down so that the people around us aren't disturbed and think we're rude."

These are all teachable moments that we as mothers should take advantage of to instill a value or character trait, or in today's case, social etiquette.

"It's when the whole world is your school instead of school being your whole world." -Eli Gerzon


I am thankful to be able to homeschool. I get to do field trips like this on my time and on my terms; My children get to be with their family instead of care-givers, peers, or even strangers; And! We're making happy memories and deepening our bond while learning life skills. 

Yes, I have a very blessed life indeed! And I'm so happy that I get to share all of this with you! Thank you, my friends, for stopping by my blog today. I appreciate all of the positive feedback you all have lavished on me throughout my blogging journey!

What are some ways you teach etiquette? I'd love to hear about it! 

Take care sweet friends,

~ Courtney:)

Monday, August 8, 2016

A "Big Boy's" Room

I have fallen a bit behind in my room makeover posts.

Today I'd like to share with you the "Before and After" photos of my boys' bedroom. 

As it currently stands, this is what their room looks like from the hallway looking in:


And what it looks like from the opposite direction; standing at the window:


This room was the first bedroom we made over when we were new in our renovation journey. I chose this room to do first because Roman was a toddler then, and I wanted him to have a nice bedroom. 

But since then I've redecorated to give him and Soren more of a "big boy" room. So really, this room has seen two makeovers. 

I'd like to record it here....

Upon buying the house, the room looked like this:


I suppose you could say that this is the original "before".

The picture above and the one below are the same two views from the pictures I showed you at the start of this post.


I went through a decorating phase when I was younger, of painting the rooms in my house dark or bright colors. Thankfully, I've come out of that. Phew! But for Roman's room back then, I chose a vibrant blue and dark tan.

(I realized that painting a room a bright color is distracting from the art and furniture in the room, and painting a room a dark color will make you feel like you've lost square footage. Ya live and ya learn!)

Here's a "during" shot:


Micah put in new windows, and built this narrow shelf that goes around the perimeter of the room:


He also refinishes the hardwood floors of each room we re-do. This is what the floors look like before:


And after he refinishes them:


This always makes such a big difference in brightening up the rooms we make over!

This was the first "after" of Roman's bedroom about six years ago:


I remember feeling so proud, haha! 

I painted his closet door with chalkboard paint, which is something I would not do again if I had it to do over. I am much more protective of our woodwork now than I was years ago. But I loved it then, and welcomed Roman into his new room with a little chalkboard love:


Over the next couple of years we had another baby boy, our Soren Jack, and the room became his and Roman's to share:


It was a cute little boys' room while they were babies, but about two years ago I got inspired to redecorate the room. I wanted to give them more of a "big boy" room. Micah had returned home from a safari hunt in Africa, and brought with him this Impala skull:


It became the starting point of my inspiration for their "big boy" room. My vision was to clear away anything that was "baby-ish" and give them a room that they could grow into and potentially still feel proud of in their older years.

So... This is what it looks like today:


They each have their own corner of the room:


They also have a little reading area by the window that they share. This is what it looked like before:


And after:


I found this leather chair with ottoman at an antique store for $100. I happened to have some cash on me, though, and asked the shop owner if he'd take $75 for it. I used what my grandma taught me is the "magic word" when negotiating with antique dealers... Cash! He was happy to see it go for $75 cash, and I've always felt like it was a steal! 

Here's another shot of it:

This picture was taken this past winter when I noticed the beautiful sunlight that was streaming in...


You'll notice that I used to have a tall plant by the foot of Soren's bed last winter. The poor thing died a slow death and despite my efforts to help it recover, I had to pitch it this spring. I couldn't figure out why it seemed like every time I entered their room, this plant was looking worse and worse...


I was watering it!...?... It was receiving plenty of early morning sunlight!...?... I couldn't figure it out. Until one day I walked in on my then, 3-year old Soren, who had his entire dinosaur collection all spread out and he was giving each of them turns feasting on the plant. 

I said, "Soren! What are you doing? Stop being so rough with that plant!"

He said, "But they're plant-eaters, mom. They're having their lunch."

Thanks to PBS Kids, he knows his Herbivores from his Carnivores, and was only trying to take care of his toy dinosaurs, haha! But I learned the lesson that perhaps he is too young to have live plants in his room. 

How could I be mad, though? Look at how cute he is!!!


Love that boy!!! :)

Here are some other shots of the room:


I'm not a photographer, (clearly, ha!) so I couldn't decide which was best for these pictures; having their bedside lamps on or off...?


I love these lights! I bought them on Etsy. They just plug in so we didn't have to worry about hard-wiring them like a typical wall sconce! Brilliant!


Here are a few close-ups of some of my vignettes for this room:


I want to talk a little about how to decorate a room when you're on a budget. I did a few things in this room that helped cut down on cost. One example I can share is these curtain panels:


They were $25 per panel. I needed four for the two windows, which would have come to $100 just for curtains. I didn't want to spend that much, so I only purchased two panels for $50. When I got them home I cut them in half, lengthwise, and sewed up the edge with matching grey thread. It's not as full of a look as they would have been had I bought all four, but it cut my curtain cost in half!

Another example I can give you are the plaid pillows on each bed:


I purchased two men's flannel shirts for a few bucks each at a thrift store. After I washed the shirts, I cut the backs off and made pillow covers. What I'm showing in the photo above is the back of the pillow cover which was made from extra drop cloth that I had in my fabric stash. 

Which leads me nicely to the last example that I'll share, and that is whenever I'm decorating a room, I try to make work whatever I already have on hand before going out and buying something new. Like this red and cream ticking "sheet" that is actually an old shower curtain that I had stuffed in storage:


Of course, there were other budget-friendly things that I did in this room, but as it's important for me to cut back on cost, it's also important for me to cut back on blog content so that I don't bore my readers! Haha! Please know, however, that you are more than welcome to leave in the comments any questions you may have and I'll respond!

I hope you enjoyed the tour and the story of the evolution of this "Big Boy" room.....


I will end today's post with my favorite picture of the boys' bedroom... It's actually a sight I get to enjoy every night. The tradition of the "Bedtime Story" with dad:


It is a JOY to me to see the rooms in my home that I have poured my heart into to make beautiful being used and enjoyed by the people I love! This is why I not only just decorate, but strive to decorate well. 

What a blessing we can be to our families, mama's! And it's up to us! No one else will do it! 

What will you make beautiful in your home today?

~ Courtney