"My people will live in peaceful dwelling places, in secure homes, in undisturbed places of rest." - Isaiah 32:18

Saturday, April 30, 2016

Setting the Table

Is setting a proper table becoming a lost art among young families?

I really hope it's not, but unfortunately, from what I've observed, I think it might be.

I've tried to make a point in my parenting not to take my way of living down to the standard of my small children, but to call my children up to my standard, instead. 

One good and practical way to do this is in the setting of the table.


I was expecting guests for dinner Friday night, so I carved out time on Thursday to set my dining room table. I snapped pictures along the way so that I could share the process with you.
The completed table looked like this:


Since this is a blog on home living, today's post is about the steps it took to get to this nicely set table.

The first tip that I can give you is to work on your table the day before the dinner party. The day of the party is hectic enough, plus, it's a wonderful feeling to wake up to such preparedness when you know that company is coming! I just simply tell the children not to touch. My children have been trained in obedience, so this is not a problem.

On Thursday morning, after breakfast, I was ready to begin. This was the starting point:


My first order of business was to clear everything off. There was a lot to put away!


I've been reading through the book of Romans. I sit here with my coffee every morning and read one chapter. I like to read the bible this way, instead of random snippets here and there. I pick one book and read it from start to finish. I just completed Hebrews, and I read through John before that. 


I'm trying to pick New Testament books to try something different because I usually tend to gravitate toward the Old Testament books. (They're fascinating!) 

So, once everything was put away, I had an empty table; a clean slate:


It's important to disinfect the table before setting it. As you could see from the above pictures, we do a lot of living at our table, so I got out a disinfectant with a damp cloth and wiped the table down.


I gave the room a quick sweep:


Then I opened up the china cabinet to start pulling dishes out:


I determined what I wanted to use based on the menu...


And started carrying items to the sink for a hot, soapy bath:


I hand-washed goblets and sherbet dishes:


As well as my antique, hand-painted plates. If you have any dishes that are etched or hand-painted, please don't send them through the dishwasher! If you play some nice music for yourself, hand-washing them can actually be very enjoyable.


Once everything was washed and dried it was time to create the place settings. I was setting the table for ten. 

(Years ago I didn't have any chargers or place mats, so I used sheet music that I tore out of old music books. It worked just fine and I believed it was beautiful! I bring that up because I don't think it requires money or the right items to set a lovely table. Just use what you have and get creative!)

I now have these gold chargers, though, and I use them a lot.


Another tip I can share is to pull all seating away from the table while you're working on this. It's nice to not have to bump into, and reach around, chairs.

Next, I set the dinner plates:


Then the napkins:


(They're folded in thirds, lengthwise, and tucked under the plate.)


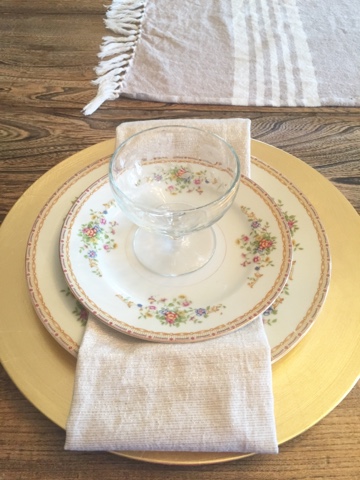
Then, the salad plates:


Then the sherbet dishes on top:


Once I reached this point, it was time to get the baby up from her nap. She watched me sweetly while I continued the process with the silverware.


Isn't she cute?! She's a good girl, too! I was singing to her and talking to her while I worked.

These are the things childhood memories are made of! Mama's! Get out your nice dishes while your kids are young! When they're adults they'll never, out of a feeling of nostalgia say, "Ah, remember when mama would set out the plastic plates and paper cups!" 

You can see here how the silverware goes. Two forks on the left; a dinner fork and a dessert fork. I off-set them just a touch. It's more visually appealing that way. The knife and spoon go on the right, with the knife on the inside, facing the plate.


All that's left now are the goblets:


And sliding the chairs back in:


There are a couple of things to take note of in the above picture. First, I decided to do a simple centerpiece of just three candles and a deer antler, instead of a tablescape. The reason for this is because I was putting the kids at the island in the kitchen, where I sometimes do a buffet-style set-up with the food. But since the kids were going to be eating there, I decided to put all of the food on the table for more of a family-style set-up. (I actually prefer it this way!) So... all of that to say, I needed room on the table!!! (Yes, there was food involved, too. Another reason to set the table the day before!)

The other thing I wanted to say about this is that I don't have 10 of everything. If you look real closely at the setting at the head of the table, it is different than the others. I'm pointing this out because I've set imperfect tables through the years and wondered if I should break down and invest in a large matching set of everything. But, in the end I never do because even with some mis-matched pieces, I've noticed, it always turns out beautiful! 

Like the well-mannered hostess that I am, I put my phone away Friday evening, (actually, I was flying around like a head-less chicken and forgot I had a phone) and didn't snap another picture until everyone left. This is the aftermath of an evening spent talking, laughing, and eating with friends. This picture was taken at midnight:


This table has had many roles and responsibilities. Many school days figuring out math, lots of sewing projects, and several years worth of gatherings with our family and friends. My prayer is that we'll have years more!!! What wonderful memories we're making!

I'll mention a quick etiquette tip before I go. One of my friends brought a hostess gift for me. I'm not sure what the etiquette books say, but in my opinion a hostess gift is not expected or necessary, however, it's extremely thoughtful and very good manners! 

This is what she brought me:


I think this is a nice hostess gift! The next time you're invited to a dinner party, consider bringing a hostess gift! Some other ideas for a small and thoughtful gift would be: A box of flavored tea bags with a pretty mug; A small window sill plant like Aloe or an African Violet; A good quality candle.

Well friends, that's all I have for you today! 

Until next time,

~ Courtney 

Tuesday, April 26, 2016

Bathroom Makeover

Thank you for bearing with me during my little blogging break.

I took a few more days off in between posts than I usually do. I've been enjoying the spring weather and finishing up the homeschool year with my first-grader.

I'm so happy to be back, and I'm back with another before and after from my old farmhouse!

Looking back at pictures, I was reminded that we tackled this bathroom in the fall of 2012.

It looks like this today:


This bathroom is tiny, and we did all the work ourselves, so don't expect magazine or Pinterest worthy photos, here. ;)

This is an old photo of the before:


Even though it's tiny, it at least has a window! I love windows in bathrooms! 

The wall with the window, before:


The wall with the window, after:


The opposite wall, before:


(If you happen to be a real observant person, you'll notice the shower curtain, shelf, and knobs are different in this picture compared to the first. The first before picture came from my album of all of the photos that I took on the night we closed on this house. This before picture must have been snapped right before we gutted it. There were a few years in between.)

The same view, after:


Living in this house while renovating it, has given me an enormous appreciation for every room we complete! I don't take these rooms for granted! I think this is one of the reasons why I love being home so much! I have heart strings attached to every little thing here! Every doorknob... every faucet handle... has a place in my heart!

(Ok, that last line makes me sound like a crazy person, but it's true!!!)

Are you ready for some during shots?

Warning: This is not for the faint of heart...

With the exception of the tub, we gutted the room:


(I'm not sure why he's smiling, haha! What a headache!!!)

Roman was so little! He helped, too!


It's hard to tell, but this is the sink:


You never know what you are going to find in an old house. There was floral wallpaper under the beadboard:


This was the flooring before:


And a shot of Micah ripping it up:

(I was so happy to see it go!)


He should be wearing gloves and safety glasses! Yikes!!!

I had my heart absolutely set on white hexagon tile with dark grey grout. I thought it would look authentic.

 I really wanted to make design decisions that would honor our home's 100-year old history. It saddens me when I see modern design decisions being made for old homes! You know... When people buy an old, run-down house and begin to fix it up, except, they fix it up modern?! I always think, If you want a modern home, buy a new house! But for the love of Pete, don't steal the charm and character from these wonderful old homes!

(I need to watch my mouth. This is one of my soapboxes.)

This is the bathroom floor now:


You can also see the walls in this photo as well. They are authentic salvaged barn wood that we painted white. I really love white beadboard in old farmhouse bathrooms, but I have it in my other bathroom and wanted to try something different in here.

Here's another shot of it:


I love it because it isn't smooth and new looking, it's actually bumpy and cracked with some worm holes in a few places. To me these walls are perfect because I didn't want this bathroom to look brand new. I wanted it to have a look as if it has been here all along.

Another design decision that I had my heart set on was subway tile for the tub surround.

(This bathroom is right around the corner from our mud room and tends to be the bathroom everyone uses when they come in from outside. There was no way I was putting white grout anywhere in this bathroom! I figured white tile would be ok, but the floor and the tub surround all have dark grey grout. I've been happy with this decision.)


Oh man, I love subway tile! But I've got to tell you a funny story about this. 

When Micah gets to work on a project, he puts his headphones in, blocks out the world, dives into it, and gets lost in "project zone". So the Saturday morning that he got to work on the tile, I was busy doing my own thing with the kids and just left him alone to work on it. In the afternoon I decided to check in with him to see how it was going. 

I found this:


I stood in the doorway, floored and speechless! I was shocked! 

He had done an entire wall the wrong way!!!

It felt like my heart had hit the floor. Am I really seeing this?! I wondered, in disbelief.

When I was going through the photo album to prepare for this post, I found this:


Oops with a smiley face! Haha! 

Friends, I'm sharing this because sometimes people ask us, "How do you know how to do what you've done in your house?" Or sometimes we've heard, "I wouldn't be able to do what you guys are doing." That kind of makes us chuckle a bit, because we've made mistakes in our farmhouse renovation journey, as you can see here. The lesson is, when you've done something that doesn't turn out how you want, go back, start over, and allow yourself to learn from it!

Micah ripped it all out and redid it. Now it looks like this:


I'm glad we went through the hassle of starting over. It was an enormous pain at the time and we felt sick over it, but in the long run, it was the right decision.

Moving on... Here is a close-up of the sink:


Again, my heart was set on these faucet handles. Nothing else would do!


Micah built the cupboard that it sits on:


I've noticed that whenever Micah builds furniture, it's always chunky and manly, haha. Our farm table, our kitchen island, and this cupboard, are all big pieces of furniture. I just let him do it... And he lets me decorate. Our home is a mix of him and me. A blend of rustic wood and crystal chandeliers... Delicate antiques and deer antlers... Big, chunky furniture and dainty, hand-painted plates.

I'll show you some of the details of the bathroom, speaking of deer antlers...


And beneath it hangs an antique mirror:


The opposite wall looks like this:


A few close-up shots: (because, you all know how I love details!)


My grandma gave me this little brass piece. I have no idea what it is but it's solid old brass and it's heavy, so I love it!


I purchased a set of two vintage locker room baskets on Etsy. This one hangs on the wall to house a few extra supplies:


And the second one sits by my kitchen sink:


A couple of old-house details... Towel hooks:


and antique hardware:


And finally, I'll end with a few extra things that Micah made to make this bathroom unique and complete.

He made the brass toilet paper holder and the heat vent cover:


And he made the medicine cabinet:


Well friends, I hope you enjoyed the tour of my teeny tiny bathroom. 


I love getting your comments! It's so fun for me to hear from you! (I don't know who's reading otherwise;) You're welcome to pop into the comments and say hi!

Until next time,

~ Courtney